RAMBLER CAP AND LID CLEANING INSTRUCTIONS
Keeping your Rambler® Drinkware spick and span is important, and that goes for our lid and caps too. Below is a simple breakdown of how to clean ‘em all.
HOW TO CLEAN YOUR RAMBLER® DRINKWARE
FOR EASY CLEANING
- Just pop it in the dishwasher — every inch of our drinkware is dishwasher safe. Don’t have a dishwasher? Hand washing them with mild dish soap will do just fine.
NOTICE RUST MARKS?
- Our stainless steel rarely rusts, but if it does, polishing it up is simple. Just grab a stainless steel cleaner at your local store.
HOW TO CLEAN YOUR RAMBLER® LIDS AND CAPS
MAGSLIDER™ LID CLEANING INSTRUCTIONS
Our splash- and shatter-resistant MagSlider Lid is unlike any other lid. Its smooth-sliding mechanism slides shut to lock in wayward drops. For a deep cleaning, the gasket and MagSlider magnet pop right off. Even better, they’re all dishwasher safe.


- Pop the MagSlider off the tumbler lid and place in the dishwasher’s utensil compartment.
- Remove gasket from the tumbler lid by using two fingers to pinch it on either side. This should make the gasket lift up from its groove. Once removed, place all parts in the dishwasher’s utensil compartment.
- Install the gaskets placing the larger blade around gasket above the smaller blade. Ensure all parts of the cap are dry before reinstalling and storing.
-
- Reminder: Larger blade around gasket should be above the smaller blade.
STRONGHOLD™ LID CLEANING INSTRUCTIONS
Our twist-on, twist-off StrongHold lid is backed with dual-slider magnet technology to add a strong layer between your free-flowing drink and the outside world. For a deep cleaning, the gasket and magnets pop right off. Even better, they’re all dishwasher safe.


To Disassemble:
- Remove the upper magnet.
- Half twist the lower magnet horizontally to remove.
- Slip off the rubber sleeve covering the lower magnet.
- Remove gasket from the lid using two fingers to pinch it on either side. Make sure slit is facing down on the lid when reinstalling.
- Place all parts in dishwasher’s utensil compartment.

To Reassemble:
- Upper magnet
- Gasket
- Lower magnet
- Wrap rubber sleeve around lower magnet
-
- Please note: This lid is not to be used with carbonated beverages. The Stronghold™ Lid ONLY fits the 20 oz. Travel Mug and is not compatible with other YETI drinkware.
TRIPLEHAUL™ CAP CLEANING INSTRUCTIONS
This is our classic cap, over-engineered to be leakproof, easy-to-carry, and tough as hell. It’s the foolproof way to transport your hydration from Point A to Point B without spilling a drop.
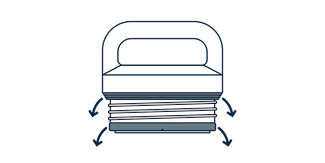

- Remove both gaskets below and above the threads and place in the dishwasher’s utensil compartment, then place cap on the top rack of the dishwasher.
- Install gaskets with flat side facing upward and the gasket grooves facing downwards toward the bottom of the cap. For a secure fit, smooth out any twists or kinks. Ensure all parts are dry before reinstalling and storing.
-
- Reminder: Install gaskets with flat side facing upward and the gasket grooves facing downwards toward the bottom of the cap. For a secure fit, smooth out any twists or kinks.
RAMBLER BOTTLE STRAW CAP & RAMBLER JR. STRAW CAP CLEANING INSTRUCTIONS
The best way to drink on the move? The Straw Cap — a one-handed flipping operation. It also includes the sturdy TripleHaul Handle for easy hauling.


For regular maintenance, we recommend the following steps be performed immediately following each use:
- Flip open top mouthpiece.
- Remove the straw and circular cap gasket and place both in the dishwasher’s utensil compartment.
- Place the disassembled cap on the top rack of the dishwasher (remember to keep the mouthpiece flipped open).
- Ensure all parts are thoroughly dry before reinstalling and storing.
- When reinstalling the gasket, you’ll notice there is a flat side and a rounded side. Install with the flat side directly against the cap
For a deeper clean, we recommended the following steps be performed on a weekly basis:
- Remove cap from bottle then disassemble the straw and circular cap gasket.
- Clean the straw with a soft bristle brush long enough to reach all internal surfaces.
- Wash bottle, cap, and gasket thoroughly using a brush, warm water, and mild dish soap. DO NOT try to remove the small pressure valve gasket.
- Place the cap, with mouthpiece flipped open, and circular cap gasket into boiling water for 5 minutes. This is to maintain hygiene.
- Thoroughly dry all components prior to reassembly, use, or storage. Store with cap removed.


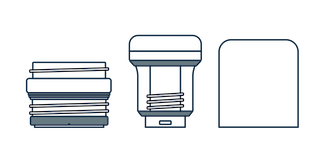
RAMBLER CHUG CAP CLEANING INSTRUCTIONS
This two-piece cap includes the narrow-spout base and a cap with the TripleHaul Handle. The top cap opens with a quick half-twist to reveal the clear-top narrow “chug” spout, which is great for keeping the ice cubes back while downing some water.

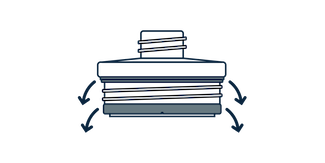
- Disassemble Chug Cap from its handle.
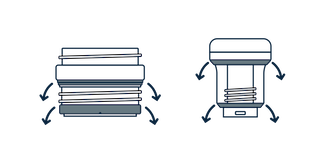
- Remove both gaskets below and above the threads and place in the dishwasher’s utensil compartment. Place cap and handle on the top rack of the dishwasher.
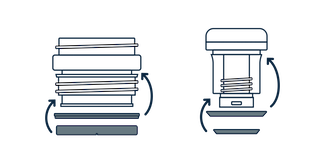
- Install the gaskets placing the larger blade around gasket above the smaller blade. Ensure all parts are dry before reinstalling and storing.
COMMUTER CAP CLEANING INSTRUCTIONS
This innovative and insulated 100% leakproof cap lives up to its name by locking in piping-hot temperatures. For added convenience, we built in a 360-degree drinking experience. Which means with just a half twist and a click, you can sip from any side.

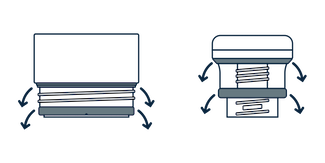
- From the closed position, twist the inner cap counterclockwise. After hearing two clicks, the inner cap can be removed for a deep cleaning in the dishwasher.
- Remove both gaskets below and above the threads and place in the dishwasher’s utensil compartment. Place inner and outer cap on the top rack of the dishwasher.
- Install the gaskets placing the larger blade around gasket above the smaller blade. Ensure all parts are dry before reinstalling and storing.
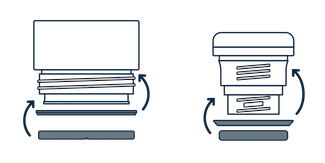
CUP CAP CLEANING INSTRUCTIONS
Transform your Rambler Bottles with our heat-locking, two-in-one companion — the Cup Cap. Not only is it compatible with every Rambler Bottle, but it also offers twice the functionality. As an insulated cap, it helps keep your coffee, tea, or even whiskey at the perfect temperature. And when you twist it off, you’ve got a double-wall vacuum insulated cup.

- Disassemble the adapter, inner cap, and 5 oz. Cup from the Rambler Bottle.
- To remove the inner cap, forcefully twist counterclockwise until it fully pops out.
- Remove both gaskets below and above the threads on the adapter and inner cap and place in the dishwasher’s utensil compartment. Place adapter, inner cap, and 5 oz. Cup on the top rack of the dishwasher.
- Install the gaskets placing the larger blade around gasket above the smaller blade. Ensure all parts are dry before reinstalling and storing.